Guide verified against upstream documentation on October 31, 2026. This is a community-recipe deployment, not an NVIDIA-certified DeepSeek appliance. Repository flags and model revisions change; read the linked upstream docs before major upgrades.
What we're building
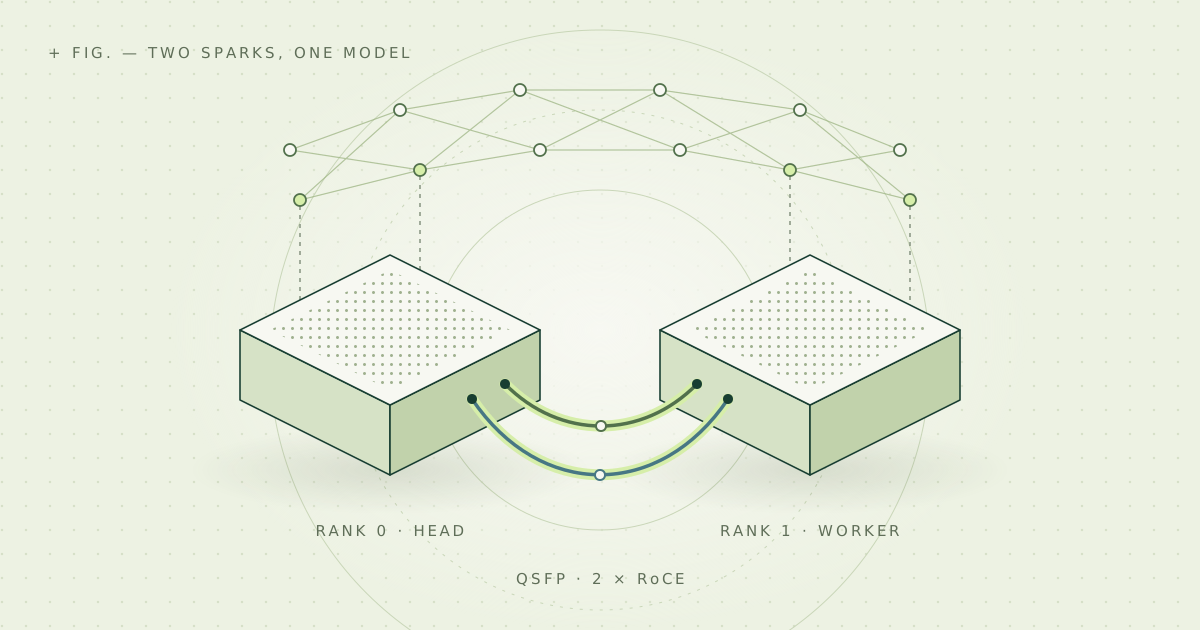
Two 128 GB NVIDIA DGX Sparks cooperate to serve one large DeepSeek model. The head runs the HTTP API; a worker supplies the second tensor-parallel rank. Both Sparks use their router-facing Ethernet connections for administration and a separate, high-speed ConnectX-7 QSFP link for inference traffic.
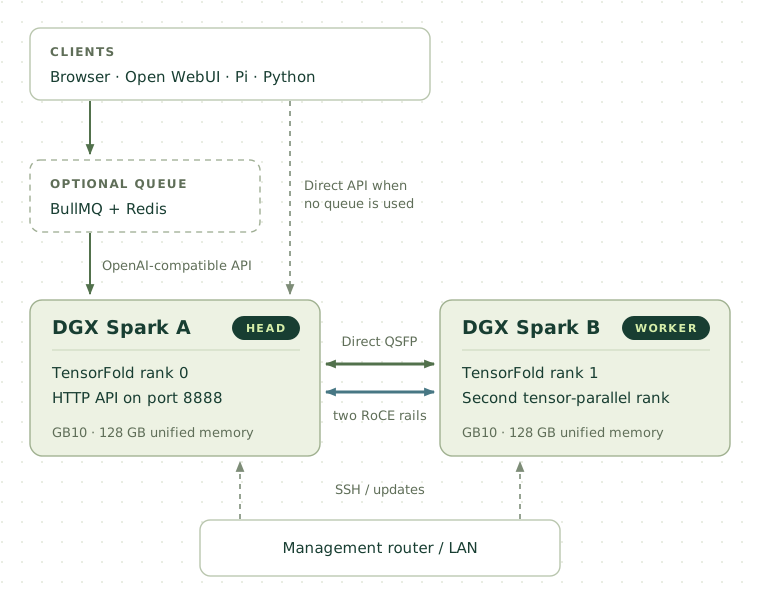
The software stack is:
| Layer | Component | Purpose |
|---|---|---|
| Hardware | 2 × DGX Spark / GB10, 128 GB each | 256 GB combined across two machines, not a magically pooled GPU |
| Cluster network | Direct ConnectX-7 QSFP link | Low-latency inter-rank traffic over RoCE |
| Cluster setup | eugr/spark-vllm-docker networking helper |
SSH, Netplan, two fabric rails and validation; not the inference engine |
| Inference | MiaAI-Lab's two-Spark deployment + pinned TensorFold | Model preparation and two-rank execution |
| Checkpoint | DeepSeek-V4.1-Flash-1017 EAQ v1 EXL3 ~2.9 bits/weight | Fits the quantized model on two 128 GB Sparks |
| API | OpenAI-compatible HTTP, port 8888 by default | Chat, reasoning, tools and image requests |
| Optional clients | Open WebUI, Pi, Python | Chat interface and autonomous coding workflows |
| Optional orchestration | Redis + BullMQ | Durable agent jobs and maintenance queues |
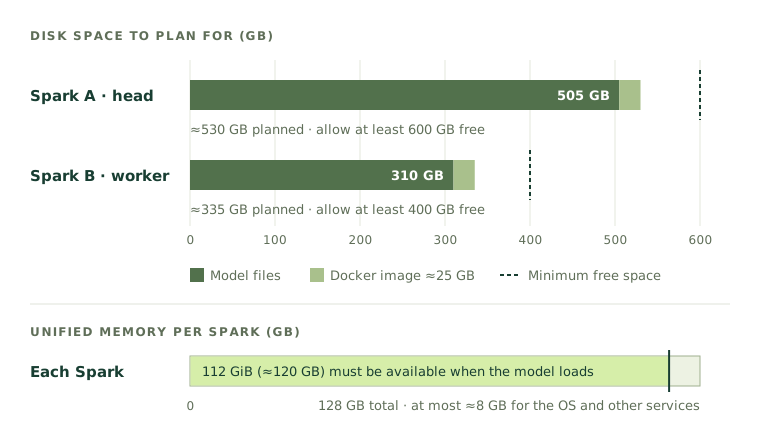
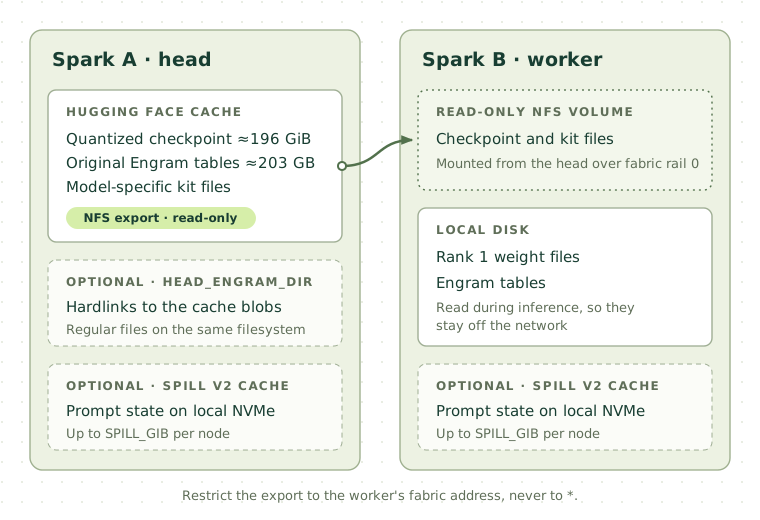
Hardware realities: the quantized checkpoint is approximately 196 GiB; the original Engram tables add approximately 203 GB of files. Plan for roughly 505 GB plus 25 GB of Docker image space on the head, 310 GB plus the image on the worker, and additional room for caches, builds and logs. Allow at least 600 GB available on the head and 400 GB on the worker before the first install. The repository's startup guard normally checks for 112 GiB of available unified memory per Spark before loading the model.
Public examples, not real machine details: Every username, hostname, management IP, fabric IP and non-repository path below is illustrative.
sparkuser,spark-head,spark-worker,192.0.2.10and192.0.2.11are examples; the192.0.2.0/24range is reserved for documentation. Fabric examples use10.77.10.0/24and10.77.11.0/24. Replace these values with your own. The cluster helper may assign different private addresses by default. Commands using$HOMEadapt to your own account.
1. Assemble and initialize the Sparks
- Connect each Spark's normal Ethernet port to a router or management switch with internet access.
- Connect the Sparks directly using a compatible QSFP cable in their ConnectX-7 ports. A port-0-to-port-1 connection can work; inspect the actual connected interfaces rather than assuming both ends have the same interface suffix.
- Ensure ventilation is unobstructed and use appropriate power adapters.
- Complete NVIDIA's supported headless first-boot flow: power on each Spark, connect another computer to the temporary onboarding Wi-Fi hotspot printed on its Quick Start Guide, and finish the web wizard. Choose the same Linux username on both machines and distinct hostnames.
- Reserve their management IPs in the router. Install supported DGX OS, driver, EC and firmware updates using NVIDIA's approved workflow. Avoid independently mixing arbitrary driver versions and firmware.
Official first-boot instructions: https://docs.nvidia.com/dgx/dgx-spark/first-boot.html
Verify on each Spark after SSH login:
uname -m                 # aarch64
hostname
whoami
nvidia-smi -L
free -h
df -h "$HOME"
ip -br -4 addr
docker version
nvidia-ctk --version
Each machine should report an NVIDIA GB10 GPU and approximately 128 GB of unified memory (Linux may show somewhat less as usable RAM). Docker and the NVIDIA container runtime normally come with DGX OS.
Install the small host prerequisites on both machines:
sudo apt-get update
sudo apt-get install -y \
    git python3 python3-yaml openssh-client openssh-server \
    iproute2 iputils-ping nfs-common

docker info >/dev/null && echo 'Docker OK'
Do not install a generic desktop GPU driver or replace the supplied CUDA stack just because a generic online tutorial suggests doing so.
2. Configure the two-Spark network entirely over SSH
Use NVIDIA's documented manual cluster helper rather than NVIDIA Sync's GUI. This step does not install TensorFold or vLLM; it only prepares networking and SSH.
On Spark A (head):
cd "$HOME"
git clone https://github.com/eugr/spark-vllm-docker.git
cd "$HOME/spark-vllm-docker"
Assign your real management addresses in your current Bash session. The following are deliberately nonworking documentation addresses:
SPARK_USER='sparkuser'
HEAD_MGMT='192.0.2.10'
WORKER_MGMT='192.0.2.11'

printf 'Head=%s Worker=%s User=%s\n' \
    "$HEAD_MGMT" "$WORKER_MGMT" "$SPARK_USER"
Replace the three values before running further commands. Bash assignments use names on the left. Do not type an IP in place of the variable name in a command such as read -r -p 'IP: ' HEAD_MGMT; that results in not a valid identifier.
Preview networking without changing persistent state:
./setup-cluster.sh \
    "$HEAD_MGMT" "$WORKER_MGMT" \
    --topology direct --mtu 9000 --dry-run
Review the detected QSFP ports, the two proposed /24 private subnets, SSH and Netplan changes. A successful preview ends with:
Dry run complete; no persistent configuration was changed.Then apply from the same head SSH session (the helper prompts for approval):
./setup-cluster.sh \
    "$HEAD_MGMT" "$WORKER_MGMT" \
    --topology direct --mtu 9000
Headless safety: leave ordinary router Ethernet connected. Applying Netplan may momentarily interrupt SSH. Keep a separate management SSH connection available. Do not replace the management interface's DHCP settings with fabric addresses.
Reopen SSH after setup and run:
cd "$HOME/spark-vllm-docker"
./setup-cluster.sh --doctor --dry-run
ip -br -4 addr
ibdev2netdev
The successful doctor message is:
Doctor: all saved configuration, CX7 links, SSH, and Docker checks passed.The normal management LAN and both ConnectX rails are different networks. An illustrative post-setup address map is:
| Link | Spark A | Spark B |
|---|---|---|
| Router-facing LAN | 192.0.2.10 |
192.0.2.11 |
| Fabric rail 0 | 10.77.10.1/24 |
10.77.10.2/24 |
| Fabric rail 1 | 10.77.11.1/24 |
10.77.11.2/24 |
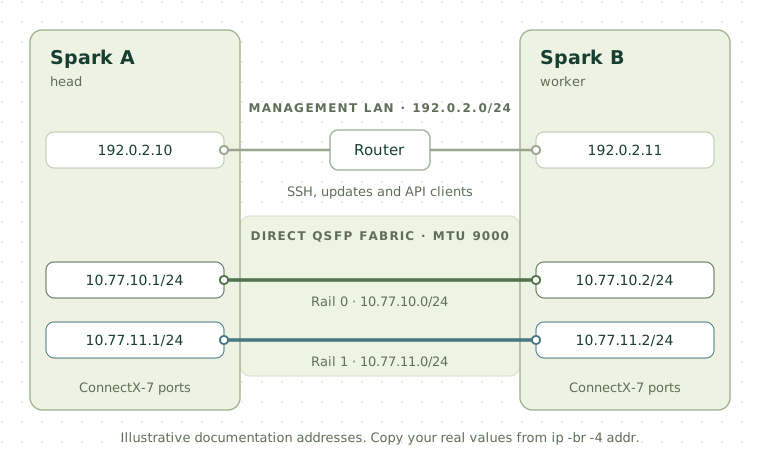
The actual helper's default private addresses may be different. Copy the real fabric addresses from ip -br -4 addr on both nodes. Also notice that the vLLM cluster helper's .env often has LOCAL_IP set to the management LAN address; don't assume it contains DeepSeek's NFS_SERVER or FABRIC_PEER fields.
For the following illustrative tests, replace the fabric addresses and interface names with those found on your machines:
HEAD_FABRIC='10.77.10.1'
WORKER_FABRIC='10.77.10.2'
WORKER_FABRIC_RAIL1='10.77.11.2'

ip -4 route get "$WORKER_FABRIC"
ip -4 route get "$WORKER_FABRIC_RAIL1"
ping -c 3 "$WORKER_FABRIC"
ping -c 3 "$WORKER_FABRIC_RAIL1"
For jumbo-packet verification, use the actual ConnectX interface name shown by ip -br link; this example name is not universal:
ping -c 2 -W 2 -M do -s 8972 \
    -I enp1s0f0np0 "$WORKER_FABRIC"
Both rails should route over ConnectX rather than the router-facing Ethernet interface. The 8,972-byte ICMP payload checks a 9,000-byte IPv4 MTU. If a route, interface or MTU test fails, fix it before deploying distributed inference.
Official network walkthrough: https://build.nvidia.com/spark/connect-multiple-sparks/advance
3. Verify head-to-worker SSH and Docker access
The cluster helper normally establishes key-based SSH. On the head:
WORKER_SSH="${SPARK_USER}@${WORKER_MGMT}"

ssh -o BatchMode=yes "$WORKER_SSH" \
    'hostname; nvidia-smi -L; docker info >/dev/null && echo "Worker Docker OK"'

docker info >/dev/null && echo 'Head Docker OK'
If key-based SSH is not working, use ssh-keygen -t ed25519 and ssh-copy-id "$WORKER_SSH" only after checking whether the cluster helper already created the keys. Make sure unattended SSH doesn't require a password, key passphrase prompt or first-time host-key confirmation.
4. Configure read-only checkpoint sharing with NFS
The head stores the Hugging Face cache. The worker reads checkpoint/kit files from the head over NFS and stores its own rank weights and Engram tables locally. Engram tables need fast local disk reads during inference.
First, on the head, check for existing exports or an NFS server container:
sudo exportfs -v
docker ps -a --format 'table {{.Names}}\t{{.Image}}\t{{.Status}}'
If the Hugging Face cache is already exported by a working host or container NFS server, reuse it; do not start a competing exporter for the same path.
For a fresh host NFS server, run on the head, with WORKER_FABRIC set to the worker's actual rail-0 fabric IP:
sudo apt-get install -y nfs-kernel-server
sudo systemctl enable --now nfs-kernel-server

mkdir -p "$HOME/.cache/huggingface/hub"
sudo install -d -m 755 /etc/exports.d

printf '%s %s(ro,sync,no_subtree_check)\n' \
    "$HOME/.cache/huggingface" "$WORKER_FABRIC" \
    | sudo tee /etc/exports.d/deepseek-hf.exports

sudo exportfs -ra
sudo exportfs -v
systemctl is-active nfs-kernel-server
The directory creation is important: on some installations /etc/exports.d does not yet exist, and tee otherwise fails with No such file or directory even while printing the line to your terminal.
Use an export filename ending in .exports. Restrict the export to the worker's fabric address; do not export to *. NFS access still depends on the Unix permissions of the exported path. If the worker receives Permission denied, inspect directory traversal permissions and UIDs instead of opening the entire home directory to everyone.
Verify NFS port reachability from the worker, using SSH from the head:
ssh "$WORKER_SSH" \
    "timeout 5 bash -c 'echo >/dev/tcp/${HEAD_FABRIC}/2049' && echo 'NFS port reachable'"
This only tests TCP connectivity. The deployment's prepare.sh creates a read-only Docker NFS volume on the worker and tests file access. NFSv4 pseudo-roots may require a different NFS_PATH; consult the recipe's NFS requirements if mounting fails.
5. Install the DeepSeek deployment on Spark A
Install Hugging Face's command-line client on the head. Using pipx avoids changing system Python:
sudo apt-get install -y pipx
pipx install huggingface_hub
export PATH="$HOME/.local/bin:$PATH"
hf --help
If hf is already installed and working, skip the installation. Clone the DeepSeek recipe on the head only:
cd "$HOME"
git clone https://github.com/MiaAI-Lab/DeepSeek-v4.1-Flash-1017-2x-DGX-Sparks.git
cd "$HOME/DeepSeek-v4.1-Flash-1017-2x-DGX-Sparks"
git rev-parse HEAD
Record the Git commit; it matters for later upgrades and troubleshooting.
Create the configuration using variables, not interactive IP prompts. First check that SPARK_USER, WORKER_MGMT, HEAD_FABRIC and WORKER_FABRIC still hold your real values in this shell:
printf 'WORKER=%s@%s\nHEAD_FABRIC=%s\nWORKER_FABRIC=%s\n' \
    "$SPARK_USER" "$WORKER_MGMT" "$HEAD_FABRIC" "$WORKER_FABRIC"
Then write scripts/local.sh:
printf 'WORKER=%q\nFABRIC_PEER=%q\nNFS_SERVER=%q\nCONTEXT=262144\nPARALLEL=2\nDRAFTS=1\nEAQ_V1_1=0\nABLIT=0\nAPI_KEY=1\nSPILL_GIB=0\nKV_SHARD=0\n' \
    "${SPARK_USER}@${WORKER_MGMT}" \
    "$WORKER_FABRIC" \
    "$HEAD_FABRIC" \
    > scripts/local.sh

chmod 600 scripts/local.sh
bash -n scripts/local.sh
cat scripts/local.sh
Why start conservatively? CONTEXT=262144 caps one request at 262K positions; PARALLEL=2 permits two active inference streams; SSD spill and KV sharding remain off until baseline inference is tested. API_KEY=1 turns on bearer-token authentication (the recipe's default may otherwise be unauthenticated). POOL is deliberately unset.
Dry-run the plan:
DRY_RUN=1 ./start.shLook for rank 0 and rank 1, two reachable RoCE rails with the expected GID indices, the worker's NFS source, port 8888, and the 262K pool. A dry run does not download weights or launch containers.
Once NFS, disk, memory and the dry run are correct, start the real deployment:
./start.shThe launcher handles the matching TensorFold image on both nodes, checkpoint downloads, model-specific kit, rank-specific weight files, local Engram copies, NFS volume and the two inference containers. Do not manually launch two independent docker run commands or invoke plain vllm serve for this checkpoint. Both ranks must use the same engine build, model revision, kit and distributed settings.
The model is served as DeepSeek-V4.1-Flash-1017 on the head's port 8888.
6. Verify both ranks and send a real request
On the head:
curl -fsS http://127.0.0.1:8888/health

docker ps --filter name=dsv41-1017-exl3-tf
ssh "$WORKER_SSH" 'docker ps --filter name=dsv41-1017-exl3-tf'

docker logs --tail 80 dsv41-1017-exl3-tf
free -h
ssh "$WORKER_SSH" 'free -h'
Health alone isn't enough: make a real authenticated completion. Create a temporary file containing the bearer-token header to avoid putting the secret directly into curl's command arguments:
umask 077
AUTH_HEADER="$(mktemp)"

printf 'Authorization: Bearer %s\n' \
    "$(cat "$HOME/.local/state/dsv41-tensorfold/api-key")" \
    > "$AUTH_HEADER"

curl --fail-with-body -sS \
    http://127.0.0.1:8888/v1/chat/completions \
    -H @"$AUTH_HEADER" \
    -H 'Content-Type: application/json' \
    --data-binary '{
      "model":"DeepSeek-V4.1-Flash-1017",
      "messages":[{"role":"user","content":"What is 19 + 23? Reply briefly."}],
      "max_tokens":256,
      "stream":false
    }'

rm -f "$AUTH_HEADER"
The launcher itself runs a smoke test. For additional upstream tests, inspect the scripts' help and run the ones supported by your checked-out revision (some may require an API-key flag or environment variable):
python3 tools/validate.py --help
python3 tools/bench.py --help
Basic operating commands
Run these from the DeepSeek repository on the head:
./start.sh                    # start / prepare if needed
./start.sh restart            # coordinated two-rank restart; interrupts active requests
./stop.sh                     # stop both ranks
DRY_RUN=1 ./start.sh restart  # inspect proposed change without restarting

docker logs -f dsv41-1017-exl3-tf
ssh "$WORKER_SSH" 'docker logs --tail 100 dsv41-1017-exl3-tf'
A single huge model spans both GPUs; they are not two independent DeepSeek instances.
7. Connect applications and a ChatGPT-like web interface
Python or any OpenAI-compatible client
On a separate development computer, create a virtual environment and install the client:
python3 -m venv .venv
. .venv/bin/activate
python -m pip install openai
Set a client-local environment variable with your API key (retrieve it securely from the head; do not commit it):
export DEEPSEEK_LOCAL_API_KEY='replace-with-your-private-key'Example:
import os
from openai import OpenAI

client = OpenAI(
    base_url="http://192.0.2.10:8888/v1",  # replace with actual head LAN IP
    api_key=os.environ["DEEPSEEK_LOCAL_API_KEY"],
    timeout=300.0,
)

reply = client.chat.completions.create(
    model="DeepSeek-V4.1-Flash-1017",
    messages=[{"role": "user", "content": "Explain tensor parallelism."}],
    max_tokens=1024,
)
print(reply.choices[0].message.content)
For access from outside the trusted LAN, prefer a VPN or an SSH tunnel rather than exposing port 8888 publicly:
ssh -N -L 18888:127.0.0.1:8888 [email protected]Then the client-side API base becomes http://127.0.0.1:18888/v1. Do not publish the API key, and restrict the server's port with firewall rules.
Open WebUI
Install Open WebUI on a separate controller/workstation, not on a memory-starved Spark. A lightweight Docker installation is:
mkdir -p "$HOME/.config/open-webui"
chmod 700 "$HOME/.config/open-webui"
printf 'WEBUI_SECRET_KEY=%s\n' "$(openssl rand -hex 32)" \
    > "$HOME/.config/open-webui/webui.env"
chmod 600 "$HOME/.config/open-webui/webui.env"

docker run -d \
    --name open-webui --restart unless-stopped \
    -p 127.0.0.1:3000:8080 \
    -v open-webui:/app/backend/data \
    --env-file "$HOME/.config/open-webui/webui.env" \
    ghcr.io/open-webui/open-webui:slim
Open http://localhost:3000, create the initial admin account, then under Admin → Settings → Connections, add an OpenAI-compatible connection:
- Base URL:
http://192.0.2.10:8888/v1(replace with head LAN IP reachable from the WebUI container). - API key: the private TensorFold bearer token.
- Model ID:
DeepSeek-V4.1-Flash-1017(add manually if/v1/modelsauto-discovery fails).
The first admin is local to WebUI; chat history lives in its Docker volume. Open WebUI, Pi and Python all share the same limited model-serving capacity.
8. Use Pi for coding agents and enable real image input
Pi is an agent harness, not a second inference engine. It can read/edit files, run tools and maintain sessions while TensorFold executes the model. Pi can connect through an OpenAI-compatible provider in ~/.pi/agent/models.json.
An illustrative complete provider entry (merge into any existing JSON rather than replacing unrelated providers):
{
  "$schema": "https://pi.dev/schemas/models.schema.json",
  "providers": {
    "local-sparks": {
      "baseUrl": "http://127.0.0.1:18888/v1",
      "api": "openai-completions",
      "apiKey": "$DEEPSEEK_LOCAL_API_KEY",
      "models": [
        {
          "id": "DeepSeek-V4.1-Flash-1017",
          "name": "DeepSeek V4.1 - Dual DGX Spark",
          "reasoning": true,
          "input": ["text", "image"],
          "contextWindow": 262144,
          "maxTokens": 32768,
          "cost": {
            "input": 0,
            "output": 0,
            "cacheRead": 0,
            "cacheWrite": 0
          }
        }
      ]
    }
  }
}
This example assumes an SSH tunnel on the Pi client using local port 18888. If Pi runs on a different reachable LAN host without a tunnel, use the head's actual LAN address instead. apiKey is resolved from the Pi process's environment. Run python3 -m json.tool ~/.pi/agent/models.json to validate JSON, then reload /model in Pi.
Image support is real in the MiaAI-Lab recipe: its EXL3 checkpoint includes the vision tower and TensorFold supports OpenAI-style image_url messages. Test a small image request directly before declaring "input": ["text", "image"] in Pi. Merely adding the metadata cannot fix an inference engine or custom request-queue adapter that strips image payloads. Test both direct Pi and queued Pi if multimodal agents fail.
Pi model documentation: https://pi.dev/docs/latest/models
9. Queue autonomous agents with Redis and BullMQ (optional)
TensorFold has its own inference scheduling, but an internal request queue is not a durable queue for entire coding-agent jobs. For multiple independent Pi jobs, a central BullMQ + Redis controller can handle job priority, persistence, retries, and maintenance.
Preferred placement: on a separate always-on controller. Putting Redis on the head Spark uses scarce unified memory and means a Spark reboot also interrupts the broker. If you choose to run it on a Spark, accept that tradeoff.
For a new, local-only Redis installation on the controller (do not use this to recreate an existing broker containing jobs):
docker run -d \
    --name pi-queue-redis \
    --restart unless-stopped \
    -p 127.0.0.1:6379:6379 \
    -v pi-queue-data:/data \
    redis:8 \
    redis-server --appendonly yes --appendfsync everysec \
    --maxmemory-policy noeviction

docker exec pi-queue-redis redis-cli PING
Expected: PONG. This example is plaintext Redis bound to local loopback only, suitable when your producer and workers run on that same trusted host. For cross-machine use, configure authenticated TLS, a private Docker network or SSH/VPN access; never expose plaintext Redis directly to the public internet.
A minimal BullMQ queue control file (maintenance.mjs) in an existing Node project with bullmq installed:
import { Queue } from "bullmq";

const action = process.argv[2];
const name = process.env.BULLMQ_QUEUE_NAME;
const redisUrl = process.env.REDIS_URL;
const prefix = process.env.BULLMQ_PREFIX || "bull";

if (!name || !redisUrl || !["pause", "resume", "status"].includes(action))
{
    throw new Error("Set BULLMQ_QUEUE_NAME and REDIS_URL; use pause|resume|status");
}

const url = new URL(redisUrl);
if (!["redis:", "rediss:"].includes(url.protocol))
{
    throw new Error("REDIS_URL must use redis:// or rediss://");
}

const connection = {
    host: url.hostname,
    port: Number(url.port || "6379"),
    db: Number(url.pathname.slice(1) || "0"),
    username: url.username ? decodeURIComponent(url.username) : undefined,
    password: url.password ? decodeURIComponent(url.password) : undefined,
    ...(url.protocol === "rediss:" ? { tls: {} } : {})
};

const queue = new Queue(name, { connection, prefix });
try
{
    await queue.waitUntilReady();
    if (action === "pause")
    {
        await queue.pause();
    }
    else if (action === "resume")
    {
        await queue.resume();
    }
    console.log(JSON.stringify({
        queue: name,
        paused: await queue.isPaused(),
        counts: await queue.getJobCounts("active", "wait", "delayed", "failed")
    }, null, 2));
}
finally
{
    await queue.close();
}
Install BullMQ in the existing Node project with npm install bullmq, and set REDIS_URL, BULLMQ_QUEUE_NAME and (if customized) BULLMQ_PREFIX to the same connection, queue name and prefix your workers already use. This maintenance tool does not create Pi workers or automatically intercept model calls. The Pi request-queue extension must actually be wired to BullMQ for queuing to happen.
node maintenance.mjs status
node maintenance.mjs pause
# Let active jobs finish; then maintain both Sparks.
node maintenance.mjs resume
Crucial distinction: globally pausing a job-admission queue still lets active agents finish. Pausing the inference queue underneath active agents can deadlock those agents when they submit their next model call. Drain at the correct layer, and separately block direct WebUI/API traffic during a maintenance window. BullMQ active jobs may be retried after worker failure: use checkpoints and idempotent tools.
10. Increase concurrency carefully
In scripts/local.sh:
PARALLEL=2
CONTEXT=262144
PARALLEL controls active inference streams, not GPU count. Both GPUs participate in each stream. Many Pi agents may exist, but their simultaneous DeepSeek calls share these streams and the same KV pool.
After measuring two streams, experiment with four:
cd "$HOME/DeepSeek-v4.1-Flash-1017-2x-DGX-Sparks"
cp -p scripts/local.sh scripts/local.sh.before-parallel4
sed -i 's/^PARALLEL=2$/PARALLEL=4/' scripts/local.sh
bash -n scripts/local.sh
grep -E '^(CONTEXT|PARALLEL|POOL|SPILL_GIB|KV_SHARD)=' scripts/local.sh
DRY_RUN=1 ./start.sh restart
Apply with ./start.sh restart only after draining active requests. The extra streams may increase aggregate tokens/sec while making individual requests slower. A shared 262K-position KV pool does not mean four requests each get 262K positions simultaneously; requests also reserve reply positions.
Use comparable prompts and saved results to measure time-to-first-token, total tokens/sec, per-stream latency, memory and cache reuse. Consult python3 tools/bench.py --help for flags supported by your current revision.
11. Enable SSD-backed prompt-state caching (optional)
The current recipe supports Spill v2, which saves reusable conversation state on each Spark's local NVMe. This can avoid processing a long agent history again after cache eviction or compatible restarts. It does not make new, cold prompts intrinsically faster.
Enable only after the unmodified deployment is stable, and first leave KV sharding disabled:
cd "$HOME/DeepSeek-v4.1-Flash-1017-2x-DGX-Sparks"
cp -p scripts/local.sh scripts/local.sh.before-spill
sed -i '/^SPILL_GIB=/d; /^KV_SHARD=/d; /^POOL=/d' scripts/local.sh
printf '%s\n' 'SPILL_GIB=64' 'KV_SHARD=0' >> scripts/local.sh
bash -n scripts/local.sh
DRY_RUN=1 ./start.sh restart
Before restarting, inspect local free disk on both Sparks and the spill directory's filesystem:
df -h "$HOME/.cache"
findmnt -T "$HOME/.cache" -o TARGET,SOURCE,FSTYPE
ssh "$WORKER_SSH" 'df -h "$HOME/.cache"; findmnt -T "$HOME/.cache" -o TARGET,SOURCE,FSTYPE'
The launcher ordinarily creates a spill directory beside the Hugging Face cache. The spill path must be local, writable and not within the NFS export or model folders. SPILL_GIB=64 means a 64 GiB per-node limit; the recipe also reserves a minimum free disk floor, normally 50 GiB. Verify compatibility of the current engine/image and review the dry-run --spill-gib settings and mounts, then drain the queue and run ./start.sh restart.
Engram fingerprint mismatch: an important real-world trap
An updated engine may refuse to pair the ranks with:
{"rank":1,"follow":"FingerprintMismatch"}
error: the ranks' builds, kits, models or TF_DS_* settings differ
This does not automatically mean that networking failed. In one known case, with spill enabled, rank 0 read an Engram directory made of Hugging Face symlinks while rank 1 read ordinary local files. The fingerprint routine saw different file listings and rejected the pair.
The supported workaround is to provide rank 0 with a local Engram directory containing matching regular files (hardlinks to the original cache blobs when on the same filesystem), then set HEAD_ENGRAM_DIR in scripts/local.sh. Newer launchers include a preflight that detects this situation before stopping an existing working server.
If the preflight or logs specifically name engram (not some other field), this is a conservative head-side workaround. It resolves the pinned Engram snapshot from the recipe and links the four required files into a regular-file directory. Run it from the head, while no preparation job is rewriting these files, and only after inspecting the source and destination paths:
cd "$HOME/DeepSeek-v4.1-Flash-1017-2x-DGX-Sparks"

(
    set -euo pipefail
    source scripts/config.sh

    SNAP="$HOME/.cache/huggingface/hub/models--deepseek-ai--DeepSeek-V4.1-Flash-1017/snapshots/$ENGRAM_REVISION"
    DEST="$HOME/.cache/dsv41-tensorfold/engram-${ENGRAM_REVISION:0:8}"

    test -d "$SNAP"
    mkdir -p "$DEST"

    for file in config.json model.safetensors.index.json \
                model-00047-of-00048.safetensors \
                model-00048-of-00048.safetensors
    do
        source_file="$(readlink -e "$SNAP/$file")"
        test -f "$source_file"

        if [[ -e "$DEST/$file" ]]
        then
            test "$(stat -c '%d:%i' "$source_file")" = \
                 "$(stat -c '%d:%i' "$DEST/$file")"
        else
            ln -- "$source_file" "$DEST/$file"
        fi
    done

    printf 'Verified local Engram directory: %s\n' "$DEST"
)
The ln operations require source and destination on the same filesystem; if you see Invalid cross-device link, stop rather than copying ~203 GB without checking capacity. The command deliberately refuses an existing destination containing different inodes rather than overwriting it. The underlying data remains shared with the Hugging Face blobs.
Tell the head rank to use that directory, then run the dry run again:
source scripts/config.sh
cp -p scripts/local.sh scripts/local.sh.before-engram-fix
sed -i '/^HEAD_ENGRAM_DIR=/d' scripts/local.sh
printf 'HEAD_ENGRAM_DIR=%q\n' \
    "$HOME/.cache/dsv41-tensorfold/engram-${ENGRAM_REVISION:0:8}" \
    >> scripts/local.sh

bash -n scripts/local.sh
DRY_RUN=1 ./start.sh restart
Verify that rank 0 mounts /engram read-only from the new local directory, and rank 1 still uses its original local Engram folder. Only then perform a coordinated restart. Use the upstream spill and KV sharding instructions if the recipe's file set changes. Never hole-punch, truncate, move or rewrite Hugging Face model files or hardlinked Engram blobs to save disk; changes through one hardlink affect the same underlying file used elsewhere.
12. Test KV-cache sharding independently (optional)
Once SSD spill is working, test KV_SHARD=1 separately. The feature partitions the KV-cache ownership across the two ranks instead of duplicating all compressed KV state. It does not improve the model's learned weights or automatically improve decoding speed.
cd "$HOME/DeepSeek-v4.1-Flash-1017-2x-DGX-Sparks"
cp -p scripts/local.sh scripts/local.sh.before-kv-shard
sed -i '/^KV_SHARD=/d; /^POOL=/d' scripts/local.sh
printf '%s\n' 'KV_SHARD=1' >> scripts/local.sh
bash -n scripts/local.sh
DRY_RUN=1 ./start.sh restart
At CONTEXT=262144, the documented derived shared pool is 528,384 positions; keep POOL unset initially because the launcher computes a compatible value. Review both ranks' flags, drain requests, restart, and compare memory, TTFT and throughput against the spill-only configuration. The engine can incur a modest per-token network overhead in exchange for KV-memory efficiency and greater usable retained context.
To undo these experimental features, back up scripts/local.sh and restore the known-good values (such as SPILL_GIB=0, KV_SHARD=0, no POOL) before a coordinated restart. Reverting flags does not require deleting cached model weights.
13. Update the MiaAI-Lab recipe and its pinned TensorFold safely
Do not blindly replace TensorFold with the latest upstream Git commit. MiaAI-Lab pins a specific engine revision, a patch stack, kit and model preparation behavior. Update the MiaAI-Lab recipe, which builds or retrieves its matching TensorFold image.
While the old server is still running, perform a read-only inspection and backup on the head:
cd "$HOME/DeepSeek-v4.1-Flash-1017-2x-DGX-Sparks"
BACKUP="$HOME/dsv41-backups/$(date -u +%Y%m%dT%H%M%SZ)"
mkdir -p "$BACKUP"
chmod 700 "$BACKUP"
cp -p scripts/local.sh "$BACKUP/local.sh"
git rev-parse HEAD > "$BACKUP/commit.txt"
git diff --binary HEAD > "$BACKUP/local-changes.patch"
docker inspect -f '{{.Config.Image}}' dsv41-1017-exl3-tf \
    > "$BACKUP/running-image.txt"

git fetch origin main
git status --short
git log --oneline HEAD..origin/main
If you have uncommitted tracked changes or a diverged checkout, resolve them deliberately. Otherwise:
git merge --ff-only origin/main
bash -n start.sh
bash -n scripts/config.sh
bash scripts/port_test.sh
python3 -I tools/selftest.py
DRY_RUN=1 ./start.sh restart
Review the updated TF_REF, checkpoint and Engram revisions in scripts/config.sh and the computed Docker image before restarting. Changing a checkpoint revision can trigger another enormous download. Back up or tag the old Docker image on both Sparks before building a new one, and avoid docker image prune until rollback is no longer needed.
Maintenance sequence: pause BullMQ job admission, let active agents and direct requests finish, keep Redis alive, stop the model through its current supervisor (if any), then perform the coordinated ./start.sh restart update. Test health, text completion, streaming, tool calls and image input before resuming the queue. A running systemd supervisor and a simultaneous manual start.sh are a bad combination: use one owner for startup.
14. Optional automatic startup with systemd
The repo includes an optional user-level supervisor. It does not automatically install or enable itself. It starts both inference ranks using SSH and should be configured only after manual installation works reliably.
Follow the official instructions at:
https://github.com/MiaAI-Lab/DeepSeek-v4.1-Flash-1017-2x-DGX-Sparks/blob/main/docs/systemd.md
Key points: copy systemd/dsv41-tensorfold.service into ~/.config/systemd/user/, set its WorkingDirectory to the real absolute checkout path, verify it with systemd-analyze --user verify, and keep its PREPARE=0 safeguard. Stop the manually launched server before starting the service. An unattended service also needs noninteractive SSH, working Docker, established fabric networking and (for after-logout boot persistence) an appropriate loginctl enable-linger configuration. Do not set per-container Docker auto-restart policies that fight the two-rank supervisor.
15. Headless thermal and reliability tuning
DeepSeek can run both GPUs continuously and use nearly all available unified memory. Ensure adequate cooling, confirm firmware updates, and measure before tweaking clocks.
On each Spark:
nvidia-smi --query-gpu=timestamp,temperature.gpu,clocks.current.graphics,utilization.gpu \
    --format=csv -l 2
Press Ctrl+C to stop the monitor. For a reversible, optional maximum graphics-clock cap, on each Spark:
sudo nvidia-smi -lgc 0,2200   # cap at 2,200 MHz if this driver supports it
nvidia-smi -q -d CLOCK,TEMPERATURE

# Restore default policy:
sudo nvidia-smi -rgc
Clock limiting may reduce temperature and power transients with a modest throughput tradeoff, but reports of a specific DGX Spark failure rate or guaranteed lifespan improvement are not established evidence. Make clock caps persistent only after comparing the same inference workload before and after. The sparkLimiter project provides multi-Spark SSH/systemd management; alternatively implement one simple local systemd unit. Use one clock-control mechanism, not two competing ones.
Do not remove memory guards, force giant pools, or run memory-heavy desktop, indexing and Redis workloads on the head just because swap exists. Leave enough available memory to avoid freezes and OOM events.
16. Troubleshooting index
| Symptom | Likely reason | First diagnostic / action |
|---|---|---|
read: '192...': not a valid identifier |
Entered an IP where Bash expects a variable name | Use HEAD_MGMT='...', then reference "$HEAD_MGMT" |
Invalid or missing fabric addresses |
Script assumed LOCAL_IP in another repo's .env is a fabric IP |
Use ip -br -4 addr on both Sparks; don't infer fabric from .env |
| RoCE/GID missing, rank handshake times out | Bad route, inactive QSFP rail, MTU mismatch | ip route get, ping, cluster helper --doctor --dry-run, inspect both ports |
tee: /etc/exports.d/...: No such file or directory |
Parent directory missing | sudo install -d -m 755 /etc/exports.d; rewrite export and sudo exportfs -ra |
| NFS port open but model files unreadable | Wrong export, NFS_PATH, UID/path permissions or competing NFS server |
sudo exportfs -v; inspect worker Docker NFS volume and file access |
FingerprintMismatch with spill |
Symlink-vs-regular Engram listing, or genuine image/settings mismatch | Read both ranks' logs; check HEAD_ENGRAM_DIR and pinned image/kit/model |
DeepSeek starts, but Pi says SUBAGENT_VISION_UNAVAILABLE |
Pi model metadata declares input: ["text"] |
Verify direct image API; update Pi model to input: ["text","image"] |
Pi says maxRetriesPerRequest limit ... model request not sent |
Queue broker unreachable, not necessarily a model failure | Check Redis container, port, TLS, network, queue gateway and client config |
Redis redis-cli ping on 6379 refuses |
Redis may use a different port or TLS | Inspect Redis logs; use correct port and CA/client certificates |
| Docker Redis container running but host port missing | Docker bridge attachment or boot-order issue | Inspect network mode, .NetworkSettings.Networks, saved port bindings and host listener |
| Memory guard kills a rank | Unified memory exhausted | Reduce context, pool, concurrency or other services; do not disable guard |
A changed scripts/local.sh has no effect |
Containers still use old configuration | Drain traffic, DRY_RUN=1 ./start.sh restart, then restart both ranks |
Redis-after-reboot case study
A container can show Up while Docker reports no attached networks ("Networks": {}), even though its saved port bindings exist. Inspect before changing anything:
docker inspect -f '{{.HostConfig.NetworkMode}}' pi-queue-redis
docker inspect -f '{{json .NetworkSettings.Networks}}' pi-queue-redis
docker inspect -f '{{json .HostConfig.PortBindings}}' pi-queue-redis
docker port pi-queue-redis
sudo ss -lntp | grep -E ':(6379|6380)\b' || true
If the container really uses default bridge, that network exists, and the container has no attached network, a conditional repair is to reconnect and restart that Redis container only:
docker network connect bridge pi-queue-redis
docker restart pi-queue-redis
Do not run this blindly against a healthy Compose/custom-network setup. A Redis server configured for TLS on port 6380 will not respond to a default plaintext redis-cli ping on 6379. --insecure only disables server-certificate verification for a diagnostic; it does not provide the client certificate required by mutual TLS. Preserve working TLS certificates, /config and /data volumes; do not delete or recreate a broker containing BullMQ jobs simply to repair a port.
17. Recommended deployment progression
For a first successful install, enable the fewest moving parts:
- Headless DGX OS and firmware setup on both machines.
- Direct QSFP link, two RoCE rails, SSH and Docker verification.
- One read-only NFS export and worker file-access test.
- EAQ v1 checkpoint,
CONTEXT=262144,PARALLEL=2,API_KEY=1. - Real text, tool-call and image validation; save the working image and Git revision.
- Move Open WebUI, Pi, Redis and BullMQ to a separate controller.
- Benchmark
PARALLEL=4versus 2 on your workload. - Test
SPILL_GIB=64alone, thenKV_SHARD=1separately, with disk and memory checks. - Enable coordinated systemd supervision and conservative GPU clock tuning after validation.
- Update through MiaAI-Lab's pinned TensorFold build with a queue-drain and rollback plan.
The takeaway: two DGX Sparks can serve a remarkably large, image-capable and tool-capable DeepSeek model locally. The hard parts are less about a single docker run than about reliable dual-rail fabric, consistent rank artifacts, local Engram access, tight unified-memory headroom and disciplined operations around multiple clients.
Sources and further reading
- NVIDIA DGX Spark first boot
- NVIDIA: connecting multiple DGX Sparks manually
- NVIDIA Sync: inspecting ConnectX-7 networks
- eugr/spark-vllm-docker cluster setup helper
- MiaAI-Lab two-Spark DeepSeek recipe
- Recipe requirements and NFS
- Recipe spill v2 and KV sharding
- Recipe systemd service
- Pi model configuration
- Open WebUI quick start
- BullMQ documentation
- MiaAI-Lab sparkLimiter